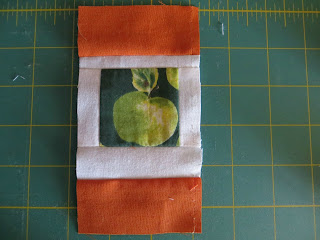
It's nearly February again and I am Queen Bee for the month in my QCA Bee. January 2011 was all about floods in Australia and January 2013 is all about bushfires. Many houses have been lost in Tasmania and New South Wales. With an Australia-wide record heatwave, fires are burning out of control in four states and two territories.
Quilt Salve
There are a couple of drives to get quilts out to folks who have lost everything. There's something lovely about a quilt gift to comfort in a disaster. So here's a great block for my bees to make and I will turn it into a gender neutral quilt to donate to an upper primary school child who has lost their home and possessions.
Finished 9 Patch Block size = 14.25" square
Finished Polaroid Block size = 3" x 3.5"
Finished Border Block Size = 5" square
Regular border width = 1.5"
Wonky border width = 2.5"
Material
2.5" square fussy cut centres = novelty or interest prints
Polaroid sashing = Spotlight white homespun OR Kona 'white'
Solid border = Choose either Dark grey, Light grey, Orange OR Aqua (similar to Kona Turquoise, Peacock, Lagoon or Robin Egg) I expect different variations between the colours and will group 3 of each colour into a stripe across the quilt.
-------------------------------------------------------------------------------------------
First - I must acknowledge the fabulous polaroid block tutorial put together by CapitolaQuilter.
Follow ALL the steps in her tutorial until you get to STOP HERE.
Second - I must acknowledge the wonky polaroid block put together by Jane of Where Jane Creates.
We will use Jane's method to make ONE wonky block.
-------------------------------------------------------------------------------------------
Method
1. Measure each of your 9 polaroids to 3"x3.5". I used a 4.5" square ruler (my new best friend) to centre the fussy cut square. Remember that the bottom is wider (1 inch).
2. Trim the white sashing to 1/2" on top and sides and 1" on the bottom. *Set ONE polaroid aside for a Wonky block later.
3. Cut 1.5" strips WOF (width of fabric) of the solid. Oops I should have ironed mine first!
4. Chain piece the top of EIGHT polaroid blocks with the solid.
5. Separate each block and repeat with chain piecing on the bottom. Press and trim.
6. Add the sides to the border.
7. Centre the polaroid section of the block. This time I used a 6.5" square ruler.
8. This time cut an even 5" square around the block.
Now for the Wonky One.
9. Take your *LAST polaroid and add the 1.5" border to the top and bottom. (You can add a 2.5" border for more wonk).
10. Now add a 2.5" border to the sides.
11. Tilt your ruler to add the wonk. Make sure the 5" square section is within the border.
12. Cut a 5" square from the border. Voila! Wonky block heaven.
Assembling the 9 Patch
13. Lay all of the 5" blocks into a 3x3 array. Move them around until you are satisfied with the layout.
14. Sew the columns, nesting the seams as you go.
25. Lastly sew the rows together.
Concept block in dark grey.
Concept block in aqua.
Link Up
If you try this block, I'd love to see your results. Free to link up your Flickr or Blog post below.


Oh my goodness, I'm planning to do similar quilt but with more than one color. I received my fabrics yesterday so I'll be able to link up your Sunday Stash this time :-)
ReplyDeleteThis is such a generous and selfless act you are doing and I want to thank and congratulate for doing so.
ReplyDeleteI have some of the polaroids left over from Kristy's swap and am also lucky enough to now be in Bee #1. This makes me feel all warm and fuzzy, knowing that the block I make will go to somebody that truly needs it as well as a little cheering up.
Love this block! It's going to be such a great quilt!
ReplyDeleteGreat tute, love the polaroid block, will file this one in my memory banks - ha!
ReplyDeleteCount me in for a block too Fi x
ReplyDeleteLove it!
ReplyDeleteGreat tutorial, was fun to make!
ReplyDelete